When I built a home five years ago, my focus was on the purpose-built listening room where I work and evaluate products for review in The Absolute Sound. I also allocated a small (16.5′ x 11′ x 9′) room as a modest two-seat television room, building into the walls during construction the not-so-modest JL Audio IWSv2-SYS-213 in-wall subwoofers, four Atlantic Technology surround speakers, and two PSB ceiling speakers, the latter for Dolby Atmos reproduction. The heart of the system is an Anthem MRX-1120 AVR with a 12-year-old 65″ Panasonic plasma as the video display. The front three speakers are PSB T3 left and right, and a PSB Imagine center-channel on a short stand in front of a low-boy equipment rack.
To give you an idea of my priorities, the TV room’s power was distributed through a 25-year-old Monster Cable power strip I happened to have lying around and stock black AC cords. By contrast, the custom-built music-listening room was supplied with five dedicated 20A circuits and conditioned with top-of-the-line Shunyata Everest conditioner and Shunyata’s best AC cords.
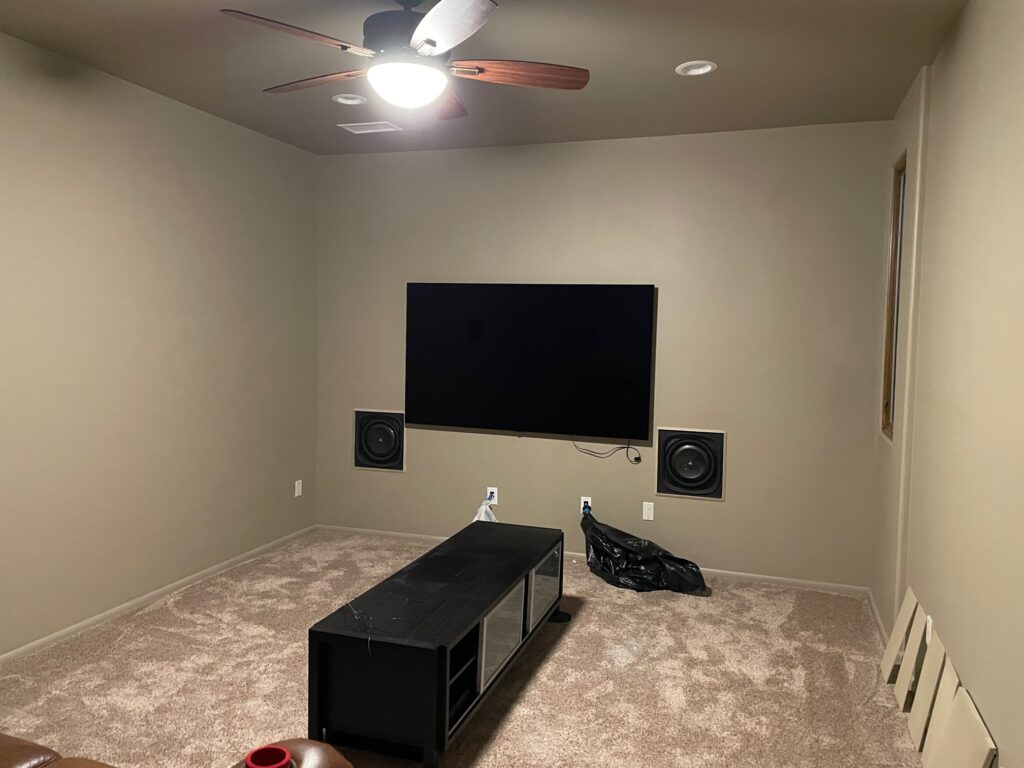
I hadn’t intended on upgrading the TV room until I walked into Costco one day and saw the stunning picture quality of an LG 77″ LCOS display. A new TV hadn’t been on the agenda, but a few weeks after seeing that amazing picture I pulled the trigger on the LG. It’s astonishing how good today’s video displays are, particularly with 4k sources. The 12-year-old plasma served me well, but it was no match for the LCOS’ picture quality and additional size.
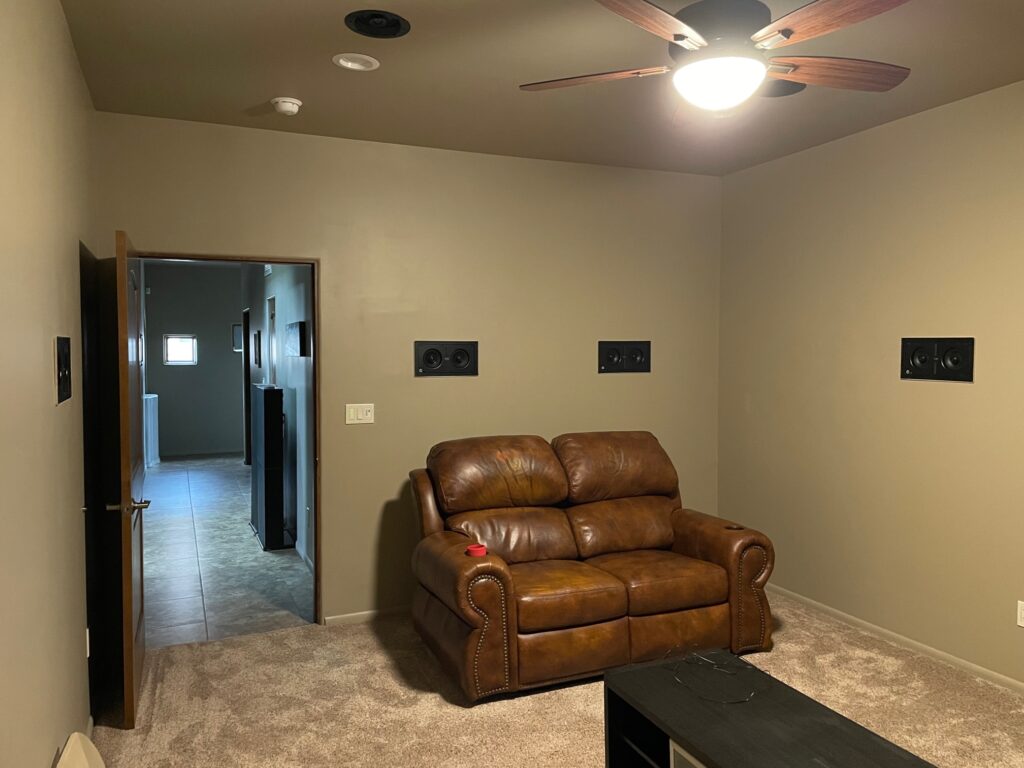
Some months later, a visiting manufacturer and I got to talking about video. He told me that he had the same LG display I had and that he greatly improved his viewing experience by covering the wall behind the TV with a black material that absorbed light. His comment inspired me to paint the entire TV room flat black. But that move set in motion a complete overhaul of the TV room. When I saw the improvement rendered by painting the room black, I resolved to transform the space into a high-quality theater. I already had the room, a great video display, surround speakers built into the walls, and the fabulous JL Audio in-wall subwoofers. All I needed was an upgrade to the AC power, better HDMI cables, and acoustic treatment. As much as I’m a believer in the value of acoustic treatments, my TV room was nothing but bare walls. The room clearly had a lot of unrealized potential.
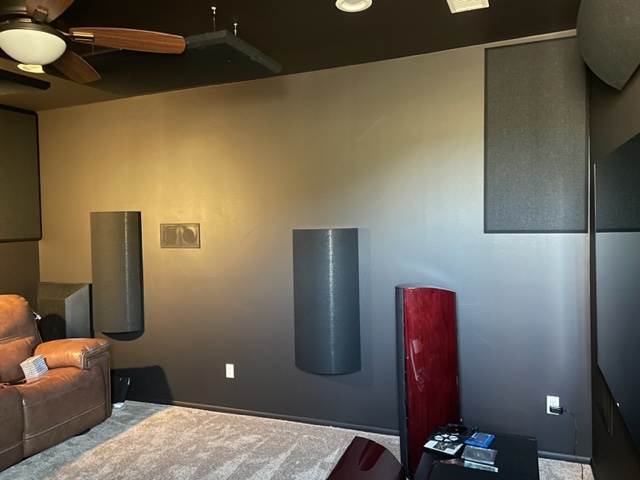
I ended up with a surprisingly great-performing home theater, so I thought I’d share with you my thought processes, decisions, and products and describe the system’s performance with the idea that some of you may want to turn a regular “TV room” into a truly outstanding home theater—even in a small space.
First, painting the room and ceiling flat black greatly increased the impression of the picture emerging from an infinite background rather than from a wall within a small room. Before the repaint, bright scenes illuminated the entire room, distracting me from the experience and pulling my attention away from the on-screen narrative. But I advise against painting the room flat black if the room is used for anything other than watching television—the room feels very oppressive when the TV is off. If the room is multipurpose, consider a compromise color that will reflect less light but not feel like a dungeon.
Next, I upgraded the AC power delivery to the components by replacing my old Monster Cable power strip and all the stock black AC cords with a specialty power conditioner and AC power cables. After researching various brands and lines, I chose an AudioQuest Niagara 3000 (which, coincidentally, is reviewed in this issue) and various levels of AudioQuest power cords (full list in the sidebar). AudioQuest makes such a wide range of conditioners and cables that you’re likely to find just the right products that fit your budget and system. I was glad to learn that AudioQuest makes specialty AC cords terminated with the small two-pin and three-pin plugs for powering products such as the Control4 home-automation controller and Apple TV. Some of the components (4k disc player, Comcast cable box) have captive AC cords, leaving me with no upgrade option.
The next step was to replace all the HDMI cables with newer, high-performance products designed for 8k video and optimum picture quality and audio performance. Remember that the HDMI cable carries high-resolution uncompressed multichannel audio (with an appropriate source and program) along with wide-bandwidth digital video. It’s a lot to ask of a cable. With 4k sources and the spectacular LG display, I didn’t want to compromise their potential with marginal-quality HDMI cables. I again turned to AudioQuest for its wide range of HDMI cables and selected the ThunderBird 48, which is two steps below the top model.
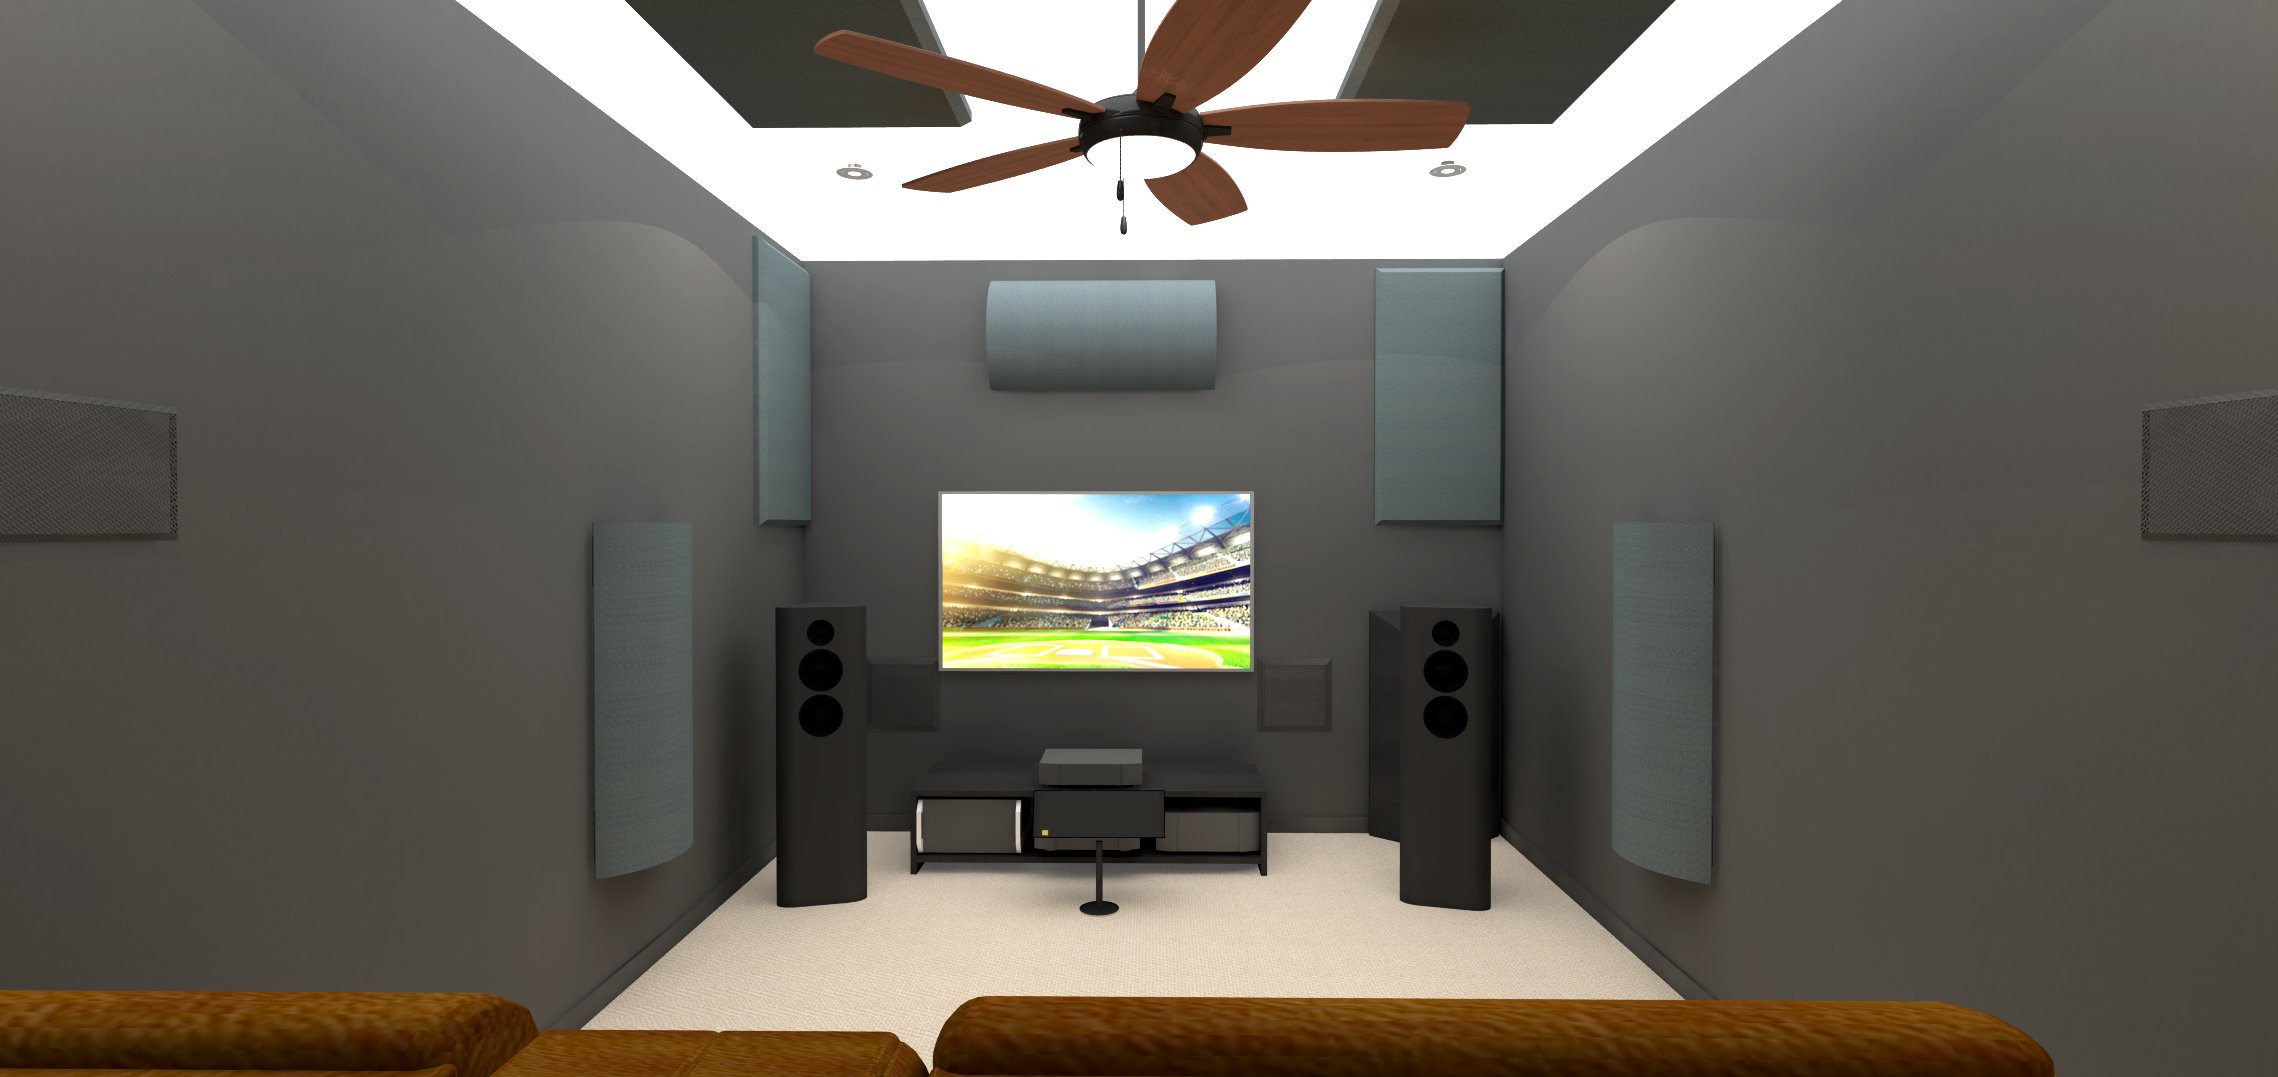
The most extensive and labor-intensive upgrade was also the most important—adding acoustic treatments to the room’s bare walls and ceiling. I went with a package from Acoustic Geometry, whose products I use successfully in my listening room. I specified seven Medium Curve Diffusers, one pair of CornerSorber bass traps, and eight Fabric-Wrapped Panels (mid-treble absorbers). Fortunately, all these products are available in a wide range of colors, including flat, non-light-reflective black. You can see in the illustrations where each is deployed.
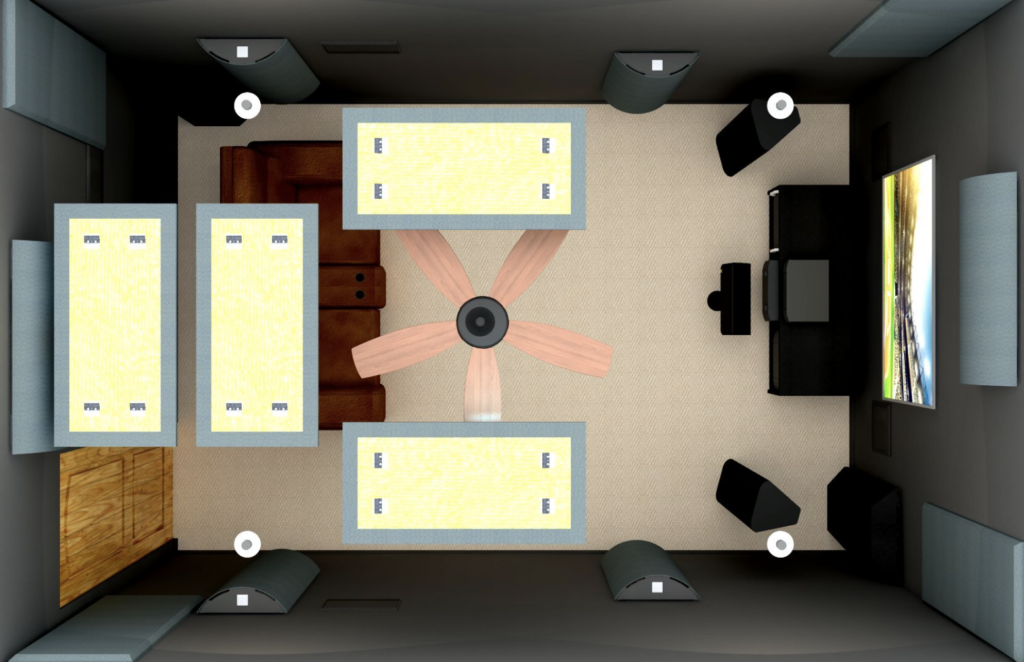
The most important treatment is positioning a pair of Curve Diffusers on the sidewalls at the first reflection points from the left and right speakers. I found these first reflection points by sitting in the listening seat and having a friend slide a small hand mirror along each sidewall in turn. The point along the wall where you can see the speaker reflected in the mirror (when seated in the listening seat) is the ideal position for the diffuser. That’s because the point of visual reflection is also the point of acoustic reflection. There’s no need to treat the entire wall surface, just the first-reflection point. A pair of diffusers (or absorbers) on the sidewalls at the first reflection point is the single most important thing you can do to improve the sound, whether in a two-channel music room or a multichannel theater. If the size, aesthetics, or cost of a Curve Diffuser ($449 each) is prohibitive, a pair of Fabric-Wrapped Panels (starting at $79 each) will also work. Although not as effective, hanging a rug on the sidewall is much better than a bare wall and its uncontrolled reflection.
Another pair of Curve Diffusers was positioned on the sidewalls directly to the sides of the loveseat. A fifth diffuser was placed on the wall behind the listening seat near the middle of the back wall. Two more diffusers, each positioned horizontally, were located above the TV and on the wall behind the listening seat above the vertically positioned diffuser, respectively. Note that the Curve Diffusers, in addition to diffusing sound and helping to break up standing waves, provide some midbass absorption. They have a rubber membrane on the backside that, when placed near a boundary, absorbs midbass frequencies.
One CornerSorber bass trap was parked against the wall behind the right loudspeaker, with the second CornerSorber in the opposite corner. Bass traps are most effective in the corners behind the left and right speakers, but my room’s layout precluded this placement. Note that CornerSorbers must be placed flush against a wall to be effective; the rubber membrane on their back sides must be next to a wall where the velocity of air is the lowest and the air pressure is the greatest. I’ve found from my experiments in a different untreated room that CornerSorbers are very effective in absorbing low bass. My music listening room has four CornerSorbers, two in each corner behind each speaker.
Finally, four of the eight mid-treble absorbers (Fabric-Wrapped Panels) were affixed to the walls vertically in each corner near the ceiling so that each one faced an untreated section of the opposing wall. Each panel measures 2′ x 4′ and is about 2″ thick. You can also mount a pair of Fabric-Wrapped Panels in each corner at the ceiling as I do in my music-listening room (eight units in total for the four corners) for greater mid-treble absorption. I hung four more Fabric-Wrapped Panels from the ceiling, with one each over the ceiling’s first reflection point from the left and right speakers, respectively, with the other two directly over the listening position.
Acoustic Geometry’s website features many helpful videos explaining these products and how best to deploy them.
The JL Audio in-wall subwoofers employ JL’s very effective Digital Automatic Room Correction (DARO) technology that flattens the frequency response at the listening position. DARO is very powerful, creating and applying 18 custom-tailored filters to boost or cut certain frequencies to reduce the amplitude of bass peaks and to boost bass suckouts at the listening position. I’ve used DARO in quite a few applications and have found it to be amazingly effective in removing bass thickness and boom. After DARO, the bass is dramatically tighter, cleaner, better articulated, more dynamic, and punchier. In addition, the Anthem MXR 1120 AVR includes the equally impressive Anthem Room Correction (ARC) that also employs powerful DSP to reduce room- and speaker-induced peaks and dips.
Considering all this digital firepower on tap, why does a room need acoustic treatments, particularly the CornerSorber bass traps? Why not just let the DSP fix everything?
The Equipment
For power conditioning, I chose the AudioQuest Niagara 3000. It is less expensive than the Niagara 5000 and 7000 and is the second-lowest-priced conditioner to include AudioQuest’s Transient Power Correction that supplies the power amplifier and one other high-current device with a current reservoir. This feature, designed for current-hungry amplifiers, is available on two of its outlets. I plugged the Anthem AVR and JL Audio subwoofer amplifier into these outlets. The 3000 also has AQ’s AC-Ground-Noise Dissipation for reducing noise on the power feeding your components. See Muse Kastanovich’s review in this issue for a full evaluation of the Niagara 3000.
The 3000 doesn’t ship with an AC cord; you must choose your own. For the crucial link between the 3000 and the wall outlet, I went with an AudioQuest Hurricane HC C19 AC cord. It is midway in AQ’s top Storm Series (there are three series) and features AQ’s 72V Dielectric Bias System (DBS). For the Anthem AVR and JL subwoofer amplifier, I went down to the cost-effective Wind Series and chose the Blizzard AC cables. To power the Apple TV and LG video, I picked AC cords from the NRG series, the most cost-effective line, specifically a pair of the NRG-Z2 C7 for the Apple TV streaming box and the LG video display, respectively. The NRG-X3 C5 powered the Control4 home-automation control unit. Although the least expensive series, the NRG line features AQ’s Zero-Tech, Perfect-Surface Copper, Semi-Solid Concentric Conductors, and Direction-Controlled conductors and shields to drain noise from the signal. Even AudioQuest’s least-expensive power cord is vastly better than stock AC cords. This package of AC conditioner and AC power cords seemed to offer the highest value by matching the AC cord to its application.
HDMI cables were various lengths of ThunderBird 48. This HDMI cable features solid conductors of polished long-grain copper that has been silver plated. The conductors’ silver content is 10 percent. It also features graphene and carbon as part of the “Level 5” Direction-Controlled noise dissipation system. Finally, ThunderBird’s ARC (Audio Return Channel) also features 10% silver conductors and drains.
The acoustics package consists of two Acoustic Geometry CornerSorbers, seven Medium Curve Diffusers, and eight Fabric-Wrapped Panels. I recommend two pairs of CornerSorbers, one pair in each corner behind the left and right speakers, respectively if your room can accommodate them.
DSP room correction works by boosting the amplitude of bass suckouts and attenuating peaks as measured at the listening position. It measures the entire system response (speakers and room) and creates a series of filters with the inverse frequency response of the measured response. Then, when that filtered signal is modified by the speakers and room, the result is flat response at the listening position.
But this approach runs into the limitations of the loudspeaker and the amplifier powering it. Consider that if you have, say, a 12dB suckout at 42Hz at the listening position (caused by the room’s resonant modes), the DSP will boost a band of frequencies centered at 42Hz. If a full 12dB of boost is applied to eliminate the suckout, the power amplifier must deliver four times the output power over that band of frequencies compared with no DSP, and the woofer must handle four times the power and be capable of the vastly greater driver excursion required for a 12dB boost in acoustic output. This puts a tremendous strain on the amplifier and the woofer, mechanically, magnetically, and thermally. Moreover, with the amplifier and woofer operating at or near their maximum capability because of this boost, they have very little dynamic headroom available to reproduce dynamic peaks. It can also lead to amplifier overheating and shutdown, amplifier or woofer distortion, and woofer failure.
For these reasons, designers of DSP room-correction systems limit the amount of boost and cut so as not to overload amplifiers and woofers, the characteristics of which are sometimes unknown to them. (For DSP built into subwoofers, the DSP programmer can take into account the subwoofer’s amplifier/driver limitations.) This approach protects amplifiers and woofers to some degree, but the boost still taxes the capabilities of amplifiers and woofers. Moreover, the amount of correction of a bass suckout is limited.
This is where acoustic treatment helps. By acoustically reducing frequency-response variations in the bass before the DSP system measures the complete system response (speakers and treated room), the DSP doesn’t need to apply as much correction. Amplifiers and woofers are less stressed, and, consequently, the system has greater dynamic headroom to handle peaks.
Pricing
AudioQuest Niagara 3000 AC power conditioner: $3900
AudioQuest Hurricane HC AC power cord: $1900 (1m)
AudioQuest Blizzard AC power cords (x2): $69 each (1m)
AudioQuest NRG Z2 C7 (x2): $199 each (1m)
AudioQuest NRG X3 C5 AC power cord: $79 (1m)
AudioQuest ThunderBird 48 eARC Priority HDMI cable (3m): $895
AudioQuest ThunderBird 48 HDMI cable (0.75m, x3): $795 each
Acoustic Geometry Medium Curve Diffusers (x 7): $449 each
Acoustic Geometry CornerSorbers (x2): $999 each
Acoustic Geometry Fabric-Wrapped Panel (x8): $79 each
Paint and painting labor: $648
Total upgrade price: $17,169
In addition, DSP room correction, as powerful as it is, can’t correct the many, many very-narrow-band peaks and dips of comb filtering at higher frequencies that occur when direct sound from the loudspeakers combines with reflected sound from a sidewall or ceiling. DSP also can’t fix phenomena such as flutter echo (the “pinging” sound you hear when you clap your hands in an untreated room, caused by repeated reflections between two surfaces) or excessive reverberation time.
In short, DSP room correction in a theater system is a great boon (particularly in a small room that is likely to have compromised bass performance), but it’s not a panacea. It works best when applied after the room is treated with a strategically chosen and positioned array of acoustic products and loudspeaker placement is made ideal. Together, correct loudspeaker placement, acoustic treatments, and DSP room correction are a powerful combination for realizing tight, articulate, well-defined, and non-boomy bass, particularly in a small room where the resonant modes are spaced far apart and thus more audible.
Evaluating Performance
I performed each of these upgrades one at a time and evaluated their effects independently of the others. Later in this article, I’ll prioritize the upgrades with the thought that many of you may want to improve your theater systems without the full overhaul that I went through.
After replacing the old power strip and stock black AC cords with the Niagara 3000 and AudioQuest power cords, I heard a significant improvement in virtually every aspect of the sound. The bass was better in every way—deeper, tighter, and much more dynamic. Kickdrum had greater impact and extension, and low-frequency effects in film soundtracks had more power and punch. The midrange and treble were cleaner—less hard and brittle. The Niagara 3000 and power cords reduced the glare in the upper midrange as well as a metallic sound in the treble. Overall, the sound was more relaxed and organic, with a great sense of ease.
The next upgrade was the HDMI cables. I had never compared and evaluated HDMI cables and had no idea what to expect to see and hear. I replaced all the HDMI cables at once, swapping a mishmash of generic cables, including a decades-old Monster Cable in the crucial link from the AVR to the video display, for AudioQuest’s third-from-the-top model, ThunderBird 48. The long run from the AVR to the LG display was ThunderBird 48 eARC.
The first track I auditioned with the new HDMI cables was the blues classic “Key to the Highway” from the recent Eric Clapton acoustic set Lady in the Balcony that I’d been using for other evaluations in the room—a track I knew well. The 4k Ultra disc has superb audio and video quality, and the live nature of the recording, coupled with the lack of isolation between instruments and the large reverberant room of the English country manor where it was recorded, make this a wonderful recording, both technically and aesthetically.
I should know by now not to be surprised by anything, but I was astonished to discover just how big an improvement the HDMI cables made. Here are just a few examples from “Key to the Highway,” which were consistent with what I heard on a wide range of music. Clapton’s voice leaks into all the other microphones, adding a wonderfully natural sense of air and realism that you simply don’t hear on close-miked studio recordings. After swapping the HDMI cables, this air around his voice was much more pronounced and organic, with the newly revealed bloom seeming to open up and expand the soundstage, taking the presentation out of the speakers. This phenomenon also had the effect of making the small quarters of the theater room disappear to a greater extent, replacing the space with the acoustic of the recording venue.
There’s a section of this track where the camera is on Clapton, but you can see drummer Steve Gadd in the background softly playing the snare with brushes. With the old HDMI cables, the sound of the brushes was barely audible; with the ThunderBird 48, the sound of brushes on snare drum was suddenly vivid, alive, and detailed. The new HDMI cables resolved a wealth of low-level detail that was simply missing with the lower-quality HDMI cables. Nathan East’s acoustic bass took on greater clarity and definition, making it easier to hear pitches, and the starts and stops of each note were clarified rather than sounding indistinct and blurred. I could cite other examples, but you get the idea. I had no clue that HDMI cables could sound—or look—so different; the picture quality improved also, with more vivid colors, more apparent dynamic range, and a greater sense of three-dimensionality.
Adding the room acoustics was the final upgrade. At the end of a long day installing the Acoustic Geometry products, I took a break and came back to the room where I had assembled my repertoire of test material to evaluate the effect of adding the acoustic treatments. I had my usual and familiar array of CDs, music videos, concert performances, and films on 4k Ultra HD discs with uncompressed high-resolution multichannel soundtracks, thinking that I would need all of them to fully assess the effect of the acoustic treatment.
Priorities
Not all readers will want to invest as much time, effort, and money as I did, so I’ve listed below the steps I would take in order of priority and value.
– Optimize loudspeaker placement; this no cost tweak can yield a surprisingly big sonic improvement. All the other upgrades should be built on a foundation of good loudspeaker placement.
– Paint the wall behind the TV a dark color if painting the entire room is out of the question. If used only for TV watching, consider painting the entire room.
– Position a pair of Curve Diffusers or Fabric-Wrapped Panels on the sidewalls at the first-reflection points.
– Add a power conditioner and replace stock AC cables. AudioQuest makes the PowerQuest Series starting at $100, with AC power cords starting at $80. If your budget permits, the Niagara 3000 is an outstanding performer and ideally suited to a theater system.
– Add Fabric-Wrapped Panels to control mid- and high-frequency reflections.
– Upgrade the HDMI cables with the best models you can afford.
– Add more acoustic treatments as budget permits. Acoustic Geometry’s website includes a video explaining the best order to add treatments and where to place them.
When I turned on the system it happened to be on the news channel I watch most evenings, with the newscaster’s voice that I’ve heard for years through this system in the untreated room. As soon as I heard the voice, I knew that the acoustics made a massive improvement in sound quality. The newscaster’s voice was suddenly missing something—a metallic hardness and brittleness through the upper-midrange. Now, his voice was smooth, natural, warmer, and more relaxed. I can’t overstate the difference. I had not expected to hear such improvement on a single voice reproduced at a low level.
But it was with more challenging sources that really revealed the effect of the room acoustics. The lack of glare in the upper midrange did wonders for every type of music and film soundtrack. Diana Krall’s piano on the Blu-ray Disc Live in Paris was warmer, richer, denser in texture, and devoid of the brittle character in the upper register. Her voice was smoother, fostering greater relaxation and involvement. The walking acoustic bass lines were better resolved in pitch and dynamics, revealing how tight this fabulous band is. But most of all, the acoustic treatments fundamentally changed the sense of energy and hard-driving swing this band displays when playing full-tilt. (Coincidentally, I happened to see Diana Krall live last weekend.)
Film soundtracks had a much more immersive quality, with the surround field seeming to expand in all dimensions with greater diffusion of ambient sounds but also more precise localization of sounds intentionally anchored in one of the surround channels. The soundtrack to Blade Runner 2049 really revealed how the acoustic treatments transformed the small room into an apparently larger space.
Putting it All Together
After I thought I had a firm impression of each of these upgrades individually, it was time to recalibrate the system and extract the highest performance possible. I fine-tuned the speaker placement, re-ran the calibration routines, tweaked the channel levels, slightly adjusted the subwoofer level, and set up the Apple TV 4k streaming box for the best performance.
The cumulative result of all these upgrades was a wholesale improvement in sound quality in every possible criterion. The most welcome improvement for me was the significantly more natural and realistic rendering of timbre. Before, the sound was overlaid with a hardness, metallic edge, brightness, glare, and an absence of top-octave definition. This character was pervasive across all sounds and contributed, once I heard it removed, a tension, listening fatigue, and limit on how loudly I could play the system. In their place was a timbral warmth and ease that alone would have been worth the expense and effort. The banishment of these artifacts allowed the natural timbre of voices and instruments to be revealed, contributing to a more lifelike and organic rendering. Clapton’s voice and guitar on Lady in the Balcony, for example, were simply transformed by the upgrade, sounding simultaneously more vivid and present yet gentler and more relaxed.
Dialog intelligibility was greatly improved; vocals in musical performances and dialog in films were clearer and more distinct from the other sounds, making lyrics and words easier to understand. Voices were presented as separate entities rather than just other sounds congealed in a homogenized mix. Similarly, image placement was vastly better; what had seemed like one big continuous sound was revealed to be composed of individual instruments, each one separated by a sense of air and bloom. This was true for two-channel music as well as multichannel music and film soundtracks. The upgrade provided a greater illusion of the theater room’s confines disappearing, replaced by a larger space—an illusion amplified by the room’s black walls and ceiling being invisible.
The bass was also dramatically improved. Each of the individual upgrades, which I evaluated one at a time, contributed to the newfound bass performance. The Niagara 3000 and AudioQuest power cords provided better definition, dynamics, and clarity. The ThunderBird HDMI cables further enhanced the bass in similar ways. And then the addition of the Acoustic Geometry package took the bass performance to a previously unheard level. Before, the bass had been blurred and thick, lacking pitch articulation and resolution of dynamic expression. The upgrades transformed the bass, resulting in a real sense of individual notes, each with its own pitch, dynamic shading, and timbral nuance. I’ll reiterate here my high praise for the JL Audio in-wall subwoofers. They are spectacular performers, and I don’t consider the fact that they are in-walls a compromise in any way.
Low-level detail was better resolved—e.g., the brushes on snare drum mentioned earlier. The sound was richer, denser, and more nuanced as a wealth of fine detail was revealed. Finally, the system’s apparent dynamic range increased, with greater bass impact and more sudden dynamic contrasts both in the attack of notes and film effects as well as their more rapid decay. It was obvious that low frequencies decayed much more quickly, further adding to the impression of clarity and articulation. The extreme bottom end had greater punch and impact, along with greater suddenness of attack.
Hearing the system like this gave me a newfound admiration for the PSB T3 left and right speakers and Imagine center channel. All they needed was a clean drive signal and a better room to reveal their potential.
Conclusion
My experience shows that you don’t need a large space to create a first-rate home-theater system. Any small “TV room” can be transformed into a fabulous place to watch and listen to movies, music performances, and concert videos with outstanding picture and sound. I hope that my journey inspires and guides you toward realizing your own high-end theater.
Tags: HOME THEATER SETUP DESIGN

By Robert Harley
My older brother Stephen introduced me to music when I was about 12 years old. Stephen was a prodigious musical talent (he went on to get a degree in Composition) who generously shared his records and passion for music with his little brother.
More articles from this editorRead Next From Blog
See all
An Immersive Masterpiece
- Jul 01, 2025
The Physics of Describing Music Reproduction
- Jun 10, 2025

Detailed Frequency Ranges of Instruments and Vocals
- Jun 05, 2025


